
| Gliding joint | |
|---|---|
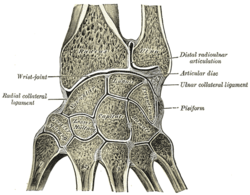 Vertical section through the articulations at the wrist, showing the synovial cavities. | |
| Details | |
| Identifiers | |
| Latin | articulatio plana |
| TA98 | A03.0.00.043 |
| TA2 | 1555 |
| FMA | 75293 |
| Anatomical terminology | |
A plane joint (arthrodial joint, gliding joint, plane articulation) is a synovial joint which, under physiological conditions, allows only gliding movement.
Plane joints permit sliding movements in the plane of articular surfaces. The opposed surfaces of the bones are flat or almost flat, with movement limited by their tight joint capsules. Based only on their shape, plane joints can allow multiple movements, including rotation. Thus plane joints can be functionally classified as multiaxial joints.[1] Plane joints are numerous and are nearly always small, such as the acromioclavicular joint between the acromion of the scapula and the clavicle. Typically, they are found in the wrists, ankles, the 2nd through 7th sternocostal joints, vertebral transverse and spinous processes.[2]
YouTube Encyclopedic
-
1/3Views:3 874 19773 3602 595
-
The 6 Types of Joints - Human Anatomy for Artists
-
Gliding Movement of Joint | Anatomy Body Movement Terms | Body Planes of Motion
-
Planar Joint I Movable Joints part - 6
Transcription
The joints of the skeleton define the motion of the body and its limitations. Hey welcome to another lesson on Proko. This lesson is about the types of joints in the human body. As artists we really only need to learn the synovial joints, like the shoulder and knee, because they move. Joints that are fibrous and cartilaginous hardly move, and some, like the connection of the two pubic bones, don't move at all. When you're learning how to draw, pay attention to synovial joints, and keep your thoughts away from pubic bones. If you know where the hinge joint is on this foot, you know that it won't do this or this when you stand on your toes. It will do this. We need to know the position of that hinge joint to make squash and stretch look like the real thing. Synovial Joints There are 6 types of synovial joints. They have varying shapes, but the important thing about them is the movement they allow. Joints determine what positions our bodies can take. We learn them to invent poses. And we learn the limits to stretch the limits. The 6 types of synovial joints are: Hinge, Pivot, Ball & Socket, Ellipsoid, Saddle, and Plane. Let's go through them one by one. Hinge The hinge is a very simple joint. It allows movement only on one axis. It's structure prevents rotation this way, or this way. The head of one bone wraps around the cylindrical head of the other, allowing a very stable rotation this way. Going back to the terminology from last week, the hinge joint allows flexion and extension. That's it! Thats all it does, but it does it well. Like the hinges on a door, allow it only to open or close. The best example of it is the elbow. Here's the rotation on a simplified skeleton. Flexion and extension. So if the elbow only allows flexion and extension, how is it that we are able to twist the forearm? Well, let's take a look at the next joint.. Pivot The pivot joint also allows rotation at only one axis. However, it rotates along the long axis. A cylindrical bone fits into a ring of bone and ligament, like with the radio-ulnar joint just below the elbow. The cap on the radius bone fits nicely into this notch on the ulna bone. Ligaments complete the ring, holding the bone in place and allow the radius only to rotate inside of it. The result on the forearm is what we call pronation and supination. During pronation, the base of the radius rotates over and around the head of the ulna. The ulna stays relatively still. Remember, the hinge joint at the elbow, prevents the ulna from twisting. So all of that twisting happens at the radius. And by the way, the distal joint of the ulna and radius is also a pivot joint. The combination of the pivot at the top and at the bottom creates that twisting motion for pronation and supination. Ball & Socket The ball & socket is the champion of all joints. Hooray for the ball and socket! It's structure is just like how it sounds. A ball inside of a socket. This simple and effective structure allows it to move in all axes - flexion, extension, abduction, adduction, rotation, and circumduction. The two ball and socket joints of the body are at the hip and the shoulder. The hip has a deep socket, which gives it stability, but limits some range of motion. The shoulder joint has a shallower socket, which gives it greater range of motion, but takes away some stability. Maybe that's why a dislocated shoulder is so common. Ellipsoid The ellipsoid joint is very similar to a ball & socket. However, the ligaments and its oval shape prevent rotation. But it still has the ability to rotate on two axes, which allows flexion/extension, abduction/adduction, circumduction. Circumduction is just a combination of all the others in a circular motion. The ball, or oval head also slides inside the socket. When it rotates along the wider plane, you can see how it pops out too much from the socket. So, it slides in back to center. A great example of an ellipsoid joint is the wrist, aka radiocarpal joint. The group of carpal bones rotate inside the socket of the radius. Saddle The saddle joint is similar to the ellipsoid, but the rotation is limited mostly because of the bone structure. The structure of the saddle is very interesting. Both bones have a concave and convex surface. Convex means the surface sticks out, like a hill. Concave means the surface curves in, like a hole or a cave. The concave plane of one fits on the convex plane of the other. It's like a 3D yin yang! Or a cowboy on a horse! The saddle makes the bottom piece and the cowboy's legs make the top piece. The legs of the top piece, which wrap around the body of the bottom piece allow a rotation this way. The body of the top piece can glide inside of the legs of the bottom piece. So, this unique structure allows the joint to flex, extend, abduct, adduct, circumduct, and very slightly rotate. An example of a saddle joint on the body is the carpometacarpal joint of the thumb. Let's see that baby in action! Plane Finally, the plane joint. Not really as interesting as the others, but deserves our love anyway. It's basically two flat-ish surfaces, one on top of the other. These surfaces can glide or rotate. They usually come in groups, like the carpals of the hand and the tarsals of the foot. Ligaments hold these bones together, but might allow some rotation and gliding. Another plane joint is the acromioclavicular joint. That's the one between the clavicle and acromion process of the scapula. When we elevate the shoulder, the angle in here will adjust to keep the scapula vertical. The Spine I mentioned in the beginning that cartilaginous joints are not important for artists, except in one, big, important case: your spine. We'll talk about that, in the next lesson. Assignments For this lesson, there's two assignments. The first assignment is to find these joints on yourself and study the movement. I've posted 6 close-up images of Skelly's joints in the description under this video. Your second assignment is to draw them as simple versions. When you try to put them into perspective, you may find it difficult, but I will have Marshall help you understand how to do it. Post your drawings in the facebook group, at facebook.com/groups/anatomy4artists. Marshall, the perspective master will help to critique your assignments in the facebook group. Later, Marshall will do a demo to show you how to simplify your forms and move them around. Last week we studied the language of anatomy. Just looking at a long list of terms can be daunting and difficult to remember. That's why I put together a PDF ebook that visually defines all these terms. This ebook is available as a premium feature at proko.com/anatomy. This week I've included another PDF ebook showing which of the 6 types every joint in the body is classified as. And again it's shown visually, rather than just a list, so you can print these out as reference. Another premium feature you'll see this week when you login to your account, is a 3D model of Robo Skelly. This is a skeleton with simplified forms. Simplified forms are a lot easier to understand, to remember and are more practical to apply to your drawings. So, you can zoom in and rotate around Robo Skelly directly in your browser. This will help you with the assignment this week and upcoming lessons when we study the skeleton in detail. To get all the premium features, go to proko.com/anatomy
References
![]() This article incorporates text in the public domain from page 286 of the 20th edition of Gray's Anatomy (1918)
This article incorporates text in the public domain from page 286 of the 20th edition of Gray's Anatomy (1918)
- ^ Betts, J. Gordon (2013). "9.1 Classification of Joints". Anatomy & physiology. Houston, Texas: OpenStax. ISBN 978-1-947172-04-3. Retrieved 16 April 2023.
- ^ Moore, et al. Introduction to Clinically Oriented Anatomy. Baltimore: Lippincott Williams & Wilkins, 2006.
This human musculoskeletal system article is a stub. You can help Wikipedia by expanding it. |