
| Imperial Japanese Navy warships in World War II[1][2] | |
| Number of units | |
| Battleships | 12 |
| Fleet carriers | 13 |
| Light carriers | 7 |
| Escort carriers | 10 |
| Heavy cruisers | 18 |
| Light cruisers | 25 |
| Destroyers | 169 |
| Destroyer escorts (Kaibōkan) | 180 |
| Sea-going torpedo boats | 12 |
| Sea-going gunboats | 9 |
| Submarines | 195 |
During World War II, at the beginning of the Pacific War in December 1941, the Imperial Japanese Navy (IJN) was the third most powerful navy in the world,[3] and the naval air service was one of the most potent air forces in the world. During the first six months of the war, the IJN enjoyed spectacular success inflicting heavy defeats on Allied forces, being undefeated in every battle.[4] The attack on Pearl Harbor crippled the battleships of the US Pacific Fleet,[5] while Allied navies were devastated during Japan's conquest of Southeast Asia.[6] Japanese Navy aircraft operating from land bases were also responsible for the sinkings of HMS Prince of Wales and HMS Repulse which was the first time that capital ships were sunk by aerial attack while underway.[7] In April 1942, the Indian Ocean raid drove the Royal Navy from South East Asia.[8] After these successes, the Japanese now concentrated on the elimination and neutralization of strategic points from where the Allies could launch counteroffensives against Japan's conquests.[6] However, at Coral Sea the Japanese were forced to abandon their attempts to isolate Australia[6] while the defeat at Midway saw them forced on the defensive. The campaign in the Solomon Islands, in which the Japanese lost the war of attrition, was the most decisive; they had failed to commit enough forces in sufficient time.[9]
During 1943 the Allies were able to reorganize their forces and American industrial strength began to turn the tide of the war.[10] The United States ultimately managed to gain the upper hand through a vastly greater industrial output and a modernization of its air and naval forces.[10] In 1943, the Japanese also turned their attention to the defensive perimeters of their previous conquests. Forces on Japanese held islands in Micronesia were to absorb and wear down an expected American counteroffensive.[10] However, American industrial power became apparent and the military forces that faced the Japanese in 1943 were so overwhelming in firepower and equipment,[10] that from the end of 1943 to 1944 Japan's defensive perimeter failed to hold.[10] Defeat at the Philippine Sea was a disaster for Japanese naval air power with American pilots terming it, the Great Marianas Turkey Shoot,[11] while the battle of Leyte Gulf led to the destruction of a large part of the surface fleet.[12] Consequently, the Japanese lost control of the Western Pacific and access to the oil fields of Southeast Asia. During the last phase of the war, the Japanese resorted to a series of desperate measures, including a variety of suicidal attacks which were popularly called kamikaze.[13] By May 1945, most of the Imperial Japanese Navy had been sunk and the remnants had taken refuge in Japan's harbors.[12] By July 1945, all but one of the IJN's capital ships had been sunk in raids by the United States Navy. By the end of the war, the IJN had lost 334 warships and 300,386 officers and men.[12]
YouTube Encyclopedic
-
1/5Views:5 738705 41242 24784 2862 924 052
-
Why were Japan's AIRCRAFT CARRIERS so POWERFUL in WWII?
-
How the Japanese Carriers were so effective
-
Imperial Japanese Navy's unluckiest ship of World War 2
-
The Imperial Japanese Navy 1946
-
The Illegal Aircraft Carrier - Ryūjō
Transcription
Strategy
At the beginning of the Pacific War, the strategy of the Imperial Japanese Navy was underpinned by several key assumptions. The most fundamental was that just as the Russo-Japanese War had been decided by the naval Battle of Tsushima (May 27–28, 1905), the war against the United States would be decided by a single decisive naval battle or Kantai Kessen.[14] This great naval clash would be determined by the big guns aboard battleships. This conviction was shared by both the Japanese and the American naval leaders alike.[15] All other arms of the navy were to be dedicated to supporting the battleships when they met the Americans in battle. The Japanese assumed that at the start of any conflict they would quickly seize the largely unprotected American-held Philippines. This would force the United States to undertake a drive across the Pacific to retake them. Consequently, the great decisive clash would take place somewhere in the western Pacific where the Japanese decided was the right area to stop the American advance.[15]
It was also clear to the Japanese that in order to win the decisive battle they would have to make up for their numerical disadvantage.[15] The Japanese acknowledged that they would never have the industrial capacity to create a navy that was equal in size to the United States,[15] however, as they were planning on fighting a defensive war they calculated that they had to have only 70 percent of the strength of the United States Navy to be in a position to achieve victory.[16] This assumption was built on two pillars, both of which became driving forces in Japanese naval construction, tactical development and training between the wars. The first was that the Japanese would had to have the weapons and tactics to inflict severe attrition on the US Pacific Fleet before the decisive battle which would bring the Japanese to at least parity. Once at rough parity, Japanese naval units with superior speed, capable of hitting at ranges beyond the reach of the Americans and crewed by expertly trained personnel, would win the day.[15]
Yamamoto's revised plan

The naval war that Japan fought in the Pacific during 1941-45 reflected a very different strategy to the one the IJN had been planning and training for throughout the interwar period.[17] This was due to the views and actions of Admiral Isoroku Yamamoto, who had assumed command of the Combined Fleet in August 1939. Yamamoto, virtually overnight, changed the passive wartime strategy of seizing the Philippines and waiting for an American naval advance to the western Pacific to a much more aggressive forward strategy.[17] Yamamoto had first discussed an attack on Pearl Harbor in March or April 1940. After the completion of the Combined Fleet's annual maneuvers in the fall of 1940, Yamamoto had directed that a study of an attack on Pearl Harbor be performed under the utmost secrecy. By December of that year, Yamamoto had decided to conduct the Pearl Harbor operation. Yamamoto was convinced that war with the United States was inevitable, once the Japanese began any hostilities. He also believed that since a traditional victory against the United States was not possible, he had to shatter American morale and force a negotiated peace.[17] For this reason he scrapped the passive strategy of creating a decisive battle in the western Pacific in favor of an initial blow so crippling that it would undermine American will to fight.[17]
The operation was risky as it exposed the IJN's most powerful striking force to early destruction. Consequently, Yamamoto had great difficulty getting his plan to attack Pearl Harbor approved by a skeptical Naval General Staff,.[18] In a series of meetings on October 17–18, 1941, Yamamoto threatened to resign unless his plan was approved. This threat finally brought approval of his plan as Yamamoto was viewed as too valuable to lose.[18] What made the whole operation possible was the formidable Kido Butai with six carriers and over 400 embarked aircraft.[18]
The Japanese strategy for the coming conflict would be to fight a limited war, in which Japan would seize key objectives and then create a defensive perimeter to defeat Allied counterattacks. This would in turn lead to a negotiated peace settlement.[19] The initial period of the war was divided into two operational phases. The First Operational Phase was further divided into three separate parts; during these, the major objectives of the Philippines, British Malaya, Borneo, Burma, Rabaul, and the Dutch East Indies would be occupied. The Second Operational Phase would entail further expansion into the South Pacific by seizing eastern New Guinea, New Britain, the Fiji Islands, Samoa, and strategic points in the Australian area. In the Central Pacific, Midway would be taken as well as the Aleutian Islands in the Northern Pacific. Seizure of these key areas would provide a defensive perimeter and depth to deny the Allies staging areas from which to mount a counteroffensive.[19]
Pearl Harbor

On December 7, 1941, two waves of 350 aircraft from the six carriers of the Kido Butai gained complete surprise and successfully hit their intended targets.[18] The initial attacks against Hawaiian airfields were also very successful and negated any possibility of an effective airborne defense, or the initiation of a retaliatory strike on the Japanese carriers by American aircraft.[18] Forty B5N torpedo bombers were the most crucial part of the operation since they were to be targeted against the main battleships and carriers. Of the eight American battleships present in the harbor, five were subjected to torpedo attack and Japanese torpedo aircraft were responsible for the sinking of the battleships Oklahoma, West Virginia and California.[18] A single torpedo hit also struck the Nevada. Additionally, torpedoes sank a target ship and a minelayer, and damaged the two light cruisers, Helena and Raleigh. In return, the Japanese only lost five torpedo bombers.[20]
The efforts of the torpedo bombers were complemented by an additional 49 B5N configured as level bombers and armed with 1,760lb armor-piercing bombs. They dropped their payload from 10,000 feet (3,000 m), scoring ten hits. One of these penetrated the forward magazine of battleship Arizona and completely destroyed the ship.[21] Other hits slightly damaged the battleships Maryland, West Virginia, and Tennessee. The 167 aircraft of the second wave, however, accomplished much less. This attack wave included 78 dive-bombers with the IJN's best crews.[20] However, against stationary targets, they scored only some 15 hits including five on the Nevada, which slowly moved down the channel to the harbor entrance. Nevada was subsequently beached to avoid blocking the channel.[20] A single bomb hit struck the battleship Pennsylvania, which was in dry dock, but caused only light damage. The light cruiser Honolulu also suffered a near miss that caused moderate damage.[20]
American losses were heavy; 2,403 personnel and bystanders were killed, 18 ships were damaged or sunk, and 188 aircraft were destroyed. In contrast, the Japanese lost 29 aircraft and five midget submarines.[22] The Japanese judged the attack as a success, believing that they accomplished their primary tactical goal, which was the destruction of the battle line of the U.S. Pacific Fleet.[5] The Japanese operations to conquer Southeast Asia and establish to a defensive perimeter could proceed without interference, and the U.S. Navy was unable to launch a major trans-Pacific counteroffensive for two years.[5] However, the two American carriers were at sea at the time of the attack and Pearl Harbor's oil storage, dry dock, submarine piers and maintenance facilities were left unscathed.[23] Additionally, contrary to the planned shattering of American morale, forcing the U.S. government to seek a compromise peace with Japan, the enormous loss of life and property from the sneak attack led to a tidal wave of outrage by the American public.[5]
First operational phase
To the surprise of the Japanese, the First Operational Phase went according to plan with extremely light losses. No ship larger than a destroyer was sunk.[19] The invasion of Malaya and the Philippines began in December 1941. The island of Guam was seized on December 8 after token American resistance. The British Gilbert Islands were seized on December 9 and 10. Japanese Land based naval bombers achieved notable success on December 10, when operating from bases in Indochina, they sank the British capital ships Prince of Wales and Repulse. The only temporary setback for the Japanese was the failure of the first attempt to seize Wake Island on December 11. In response, a carrier division from the Pearl Harbor attack force was diverted to Wake island for the a second attempt on December 22, which was successful. The British naval base of Singapore also surrendered on February 15.[19]
Allied naval opposition to the IJN during the First Operational Phase was sporadic and ineffective.[19] In the first major surface engagement of the war on February 27 at the Java Sea, an Allied naval force was defeated by a Japanese one of similar size. Following its debut at Pearl Harbor, the Kido Butai supported the capture of Rabaul in January 1942 and the Dutch East Indies in February. The only problem encountered by the Japanese during the First Operational Phase was the failure to occupy the Philippines on schedule. However, with no expectation of reinforcement, the fall of the Philippines was only a matter of time and the remaining American and Filipino forces surrendered in early May 1942.
Indian Ocean raid

The last major operation of the First Operational Phase was the Combined Fleet's raid into the Indian Ocean, code-named Operation C. It was essential for the completion of the defensive perimeter.[24]
This significant operation included five carriers to neutralize the Royal Navy's Eastern Fleet with an attack on Ceylon, the heart of British naval power in the East, and a task force built around heavy cruisers to attack shipping in the Bay of Bengal.[24] The operation began in April with the Japanese delivering heavy attacks against British bases at Colombo and Trincomalee. Japanese carrier aircraft also caught and sank a light carrier HMS Hermes and the two heavy cruisers HMS Dorsetshire and HMS Cornwall, but were unable to locate and destroy the main British fleet. The Japanese cruiser raiding force wreaked havoc with British shipping in the Bay of Bengal. From April 4 to 9, the Japanese sank 23 merchant ships totaling 32,404 tons.[25] However, the entire operation was a strategic dead end since it was only a temporary projection of power that could not be sustained and served only to put more strain on the Japanese carrier force.[26]
Strategic setbacks (1942)
The ease with which the Japanese accomplished their initial objectives led to the severe underestimation of the enemy and the resultant failure to concentrate the IJN's superior forces at key places and times.[26] As a result, the critical months of May and June 1942 saw the IJN lose both its offensive power and the initiative.[26] The Second Operational Phase was planned to expand Japan's strategic depth by adding eastern New Guinea, New Britain, the Aleutians, Midway, the Fiji Islands, Samoa, and strategic points in the Australian area.[27] However, the Naval General Staff, the Combined Fleet, and the Imperial Army, all had different views on the next sequence of operations. The Naval General Staff advocated an advance to the south to seize parts of Australia, however, the Imperial Japanese Army declined to contribute the forces necessary for such an operation,[27] which quickly led to the abandonment of the concept. The Naval General Staff still wanted to cut the sea links between Australia and the United States by capturing New Caledonia, Fiji, and Samoa. Since this required far fewer troops, on March 13 the Naval General Staff and the Army agreed to operations with the goal of capturing Fiji and Samoa.[27] The Second Operational Phase began well when Lae and Salamaua located on eastern New Guinea were captured on March 8. However, on March 10, American carrier aircraft attacked the invasion forces and inflicted considerable losses. The raid had major operational implications since it forced the Japanese to stop their advance in the South Pacific. This was to be the last of the uninterrupted victories for the Japanese until the Combined Fleet provided the means to protect future operations from American carrier attack.[27]
In April 1942, the Doolittle Raid, carried out by 16 bombers that took off from the aircraft carrier USS Hornet, 600 miles (970 km) from Japan, also had a major impact on Japanese strategy. The raid inflicted minimal material damage on Japanese soil but had major psychological repercussions in exposing the vulnerabilities of the Japanese homeland. Consequently, as the raid was mounted by a carrier task force, it highlighted the dangers the Japanese home islands would face until the destruction of the American carrier forces could be achieved.[28] With only Marcus Island and a line of converted trawlers patrolling the vast waters that separate Wake and Kamchatka, the Japanese east coast was left open to attack.[28]
Coral Sea

Yamamoto thought it essential to complete the destruction of the United States Navy that had begun at Pearl Harbor.[27] His proposal to achieve this was by attacking Midway Atoll, an objective he believed the Americans would have no choice but to fight for. Due to its proximity to Hawaii, they would be forced to contest a Japanese invasion there.[29] During a series of meetings held from April 2–5 between the Naval General Staff and representatives of the Combined Fleet, a compromise was reached. Yamamoto got his Midway operation, but only after he had threatened to resign once more. In return, however, Yamamoto had to agree to two demands from the Naval General Staff both of which had implications for the Midway operation. In order to cover the offensive in the South Pacific, Yamamoto agreed to allocate one carrier division to the operation against Port Moresby. Yamamoto also agreed to include an attack to seize strategic points in the Aleutian Islands simultaneously with the Midway operation. These were enough to remove the Japanese margin of superiority in the coming Midway attack.[30]
The attack on Port Moresby was codenamed the MO Operation and was divided into several parts or phases. In the first, Tulagi would be occupied on May 3. The carriers would then conduct a wide sweep through the Coral Sea to find and attack and destroy Allied naval forces, with the landings conducted to capture Port Moresby scheduled for May 10.[30] The MO Operation featured a force of 60 ships led by the two carriers: Shōkaku and Zuikaku, one light carrier (Shōhō), six heavy cruisers, three light cruisers, and 15 destroyers.[30] Additionally, some 250 aircraft were assigned to the operation including 140 aboard the three carriers.[30] However, the actual battle did not go according to plan, although Tulagi was seized on May 3. The following day, aircraft from the American carrier Yorktown struck the invasion force.[30] For the next two days, both the American and Japanese carrier forces tried unsuccessfully to locate each other. On May 7, the Japanese carriers launched a full strike on a contact reported to be enemy carriers, but this report turned out to be false. The strike force found and struck only an oiler, the Neosho and the destroyer Sims.[31] The American carriers also launched a strike on incomplete reconnaissance. Instead of finding the main Japanese carrier force, they only located and sank the Shōhō. On May 8, the opposing carrier forces finally found each other and exchanged strikes. The 69 aircraft from the two Japanese carriers succeeded in sinking Lexington and damaging Yorktown. In return the Americans damaged Shōkaku. Although Zuikaku was left undamaged, aircraft losses to Zūikakū were heavy and the Japanese were unable to support a landing at Port Moresby. As a result, the MO Operation was cancelled.[32] Although they managed to sink a carrier, the battle was a disaster for the IJN. Not only was the attack on Port Moresby halted, which constituted the first strategic Japanese setback of the war, all three carriers that were committed to the battle would now be unavailable for the operation against Midway.[33]
Midway
Yamamoto perceived Operation MI, the capture of Midway, as the potentially decisive battle of the war which could open the door for a negotiated peace favorable to Japan.[32] For the operation, the Japanese had only four carriers; Akagi, Kaga, Sōryū and Hiryū. Through strategic and tactical surprise, the carriers would knock out Midway's air strength and soften it for a landing by 5,000 troops.[32] After the quick capture of the island, the Combined Fleet would lay the basis for the most important part of the operation: Midway was to be bait for the USN which would, in Japanese calculations, depart Pearl Harbor to counterattack after Midway had been captured. When the US Pacific Fleet arrived, Yamamoto would concentrate his scattered forces to defeat the Americans. Concurrently with the attack on Midway, an important aspect of the scheme was Operation AL, the plan to seize two islands in the Aleutians to deny American forces the use of bases close to Japan.[32] Contradictory to persistent myth, Operation AL was not a diversion to draw American forces from Midway: the Japanese wanted the Americans to be drawn to Midway, rather than away from it.[34] However, American codebreakers had deduced an attack on Midway was imminent and American forces, including three carriers were deployed from Pearl Harbor to the Midway area, unknown to the Japanese.
The battle began on June 3, when American aircraft from Midway spotted and attacked the Japanese transport group 700 miles (1,100 km) west of the atoll.[35] On June 4, the Japanese launched a 108-aircraft strike on the island, the attackers brushing aside Midway's defending fighters but failing to deliver a decisive blow to the island's facilities.[36] Most importantly, the strike aircraft based on Midway had already departed to attack the Japanese carriers, which had been spotted. This information was passed to the three American carriers and a total of 116 carrier aircraft, in addition to those from Midway, were on their way to attack the Japanese. The aircraft from Midway attacked, but failed to score a single hit on the Japanese fleet. In the middle of these uncoordinated attacks, a Japanese scout aircraft reported the presence of an American task force, but it was not until later that the presence of an American carrier was confirmed.[36] Vice Admiral Chuichi Nagumo, was put in a difficult tactical situation in which he had to counter continuous American air attacks and prepare to recover his Midway strike, while deciding whether to mount an immediate strike on the American carrier or wait to prepare a proper attack.[37] After quick deliberation, he opted for a delayed but better-prepared attack on the American task force after recovering his Midway strike and properly arming aircraft.[37] However, beginning at 10.22am, American carrier dive-bombers surprised and successfully attacked three of the Japanese carriers.[38] With their hangar decks full of fueled and armed aircraft, plus discarded bombs and torpedoes, all three carriers were turned into blazing wrecks. Only a single carrier, Hiryū, remained operational and she launched an immediate counterattack. Both of her attacks damaged Yorktown and put the US carrier out of action. Yorktown, along with the destroyer Hammann, were later sunk by the Japanese submarine I-168. Later in the afternoon, aircraft from the two remaining American carriers found and destroyed Hiryū. With the striking power of the Kido Butai having been destroyed, Japan's offensive power was blunted. Subsequently, on the early morning of June 5, the Japanese cancelled the Midway operation and the strategic initiative in the Pacific was in the balance.[39]
Impact of Midway
Although the Japanese had lost four fleet carriers, the worst consequences of Midway were the loss of experienced aircraft maintenance personnel.[nb 1] Mark Peattie states that the engagement was "not the battle that doomed Japan".[42] The outcome did not lead to the end of the highly trained carrier aircrews[43] or radically degrade the fighting capabilities of Japanese naval aviation as a whole.[44] The Japanese only lost 110 aircrew during the battle, mostly from Hiryū with American aircrew losses being far greater than the Japanese.[43] The Japanese still had more warships of every category than the United States had in the Pacific and the Combined Fleet still possessed eight aircraft carriers, twice as many as the US Pacific Fleet.[45] Additionally, while the United States did have three large carriers in the Pacific, in comparison to Japan's two, the Japanese vessels had a total capacity for 382 aircraft, compared to 300 on the American carriers. The IJN had another carrier already fitting out to join the fleet and two more in the later stages of construction. American industry would deliver only small escort carriers during 1942, of which more than two thirds were sent to the Atlantic; the massive shipbuilding program would not get into full gear until the following year.[45] Consequently, for the time being the Japanese retained the advantage. As for naval aircraft, the Japanese were as strong as they had been at the beginning of the war. Until May and June 1942, air losses had been limited and aircraft production had kept pace with losses. From the beginning of war through the end of June, Japanese naval aircraft losses totaled 1,641.[45] Almost half of the losses occurred during the months when the battles of Coral Sea and Midway took place, with the large majority in June, including many at Midway. Over the same period Japanese aircraft deliveries numbered 1,620.[nb 2] Additionally the loss of pilots was not yet of major concern, as aircrew casualties at Midway were not so severe and the large majority of aircrew of the Kido Butai returned despite the sinking of their ships. These were bolstered by 2,000 newly trained pilots in 1942.[nb 3]
Guadalcanal and the Solomons (1942–1943)
On August 7, 1942, U.S. Marines landed on the islands of Guadalcanal and Tulagi in the Solomons, putting the Japanese on the strategic defensive for the first time in the war.[46] Vice Admiral Gunichi Mikawa, commander of the newly formed Eighth Fleet at Rabaul, reacted swiftly. Gathering five heavy cruisers, two light cruisers, and a destroyer, he sailed south and attacked the Allied naval force off the coast on the night of August 8–9. Mikawa's quick response resulted in the Battle of Savo Island, in which four Allied heavy cruisers were sunk with no Japanese ships lost.[46] This was the worst defeat ever suffered by the U.S. Navy while at sea,[46] only mitigated by the failure of the Japanese to attack the vulnerable American transports.
Aside from Mikawa's initial reaction, the Japanese were slow to respond, seeing the American landings as a reconnaissance-in-force, but by mid-August they had assembled four battleships, five carriers, 16 cruisers, and 30 destroyers to dislodge the Americans. On August 24–25, the IJN launched an operation intended to send a small transport convoy to the island and also to destroy any American naval vessels in the area. The ensuing Battle of the Eastern Solomons was the third carrier battle of the war. The IJN achieved neither of their goals, with the convoy diverted to the Shortland Islands and the American navy still present. Japanese losses were heavy, with 75 carrier aircraft, a light carrier, a transport, and a destroyer lost. [46] Although the American carrier Enterprise was damaged, she managed to elude Japanese attempts to sink her. With the Americans' Henderson Field on Guadalcanal now operational, convoys of slow transports could not go near the island without great risk. Consequently, until the airfield was suppressed, Japanese reinforcements were most-often delivered by inefficient destroyer runs to the island by night.[46]
By early September, destroyers had delivered 6,200 troops for an attack on the American perimeter,[47] but the Japanese had underestimated American forces on the island, assuming there were only 2,000 Marines: the actual number was about 20,000. The attacks launched by the Japanese on the nights of September 12–14 therefore failed. The Japanese did better in the struggle for control of the waters around Guadalcanal. On September 15, the submarine I-19 sank the carrier Wasp, leaving only a single American carrier, the Hornet, active in the Pacific.[47] But although the Japanese possessed up to six operational carriers during the same period, they failed to capitalize on the opportunity.[47]
By now the Japanese realized that Guadalcanal was a pivotal contest,[47] so for the next offensive an entire Army division was assigned, with plans to get it to Guadalcanal by mid-October for an offensive beginning October 20. To support this effort, the Combined Fleet stepped up night runs by destroyers and high-speed seaplane carriers (which carried the soldiers' heavy equipment) to Guadalcanal, and a transport convoy was assembled. Aerial bombardment of Henderson Field would be intensified, and surface warships would bombard the airfield. Admiral Yamamoto now defined the Combined Fleet's primary mission as supporting the recapture of the island, with destruction of the US Pacific Fleet a secondary objective.[47] On the night of October 13–14, the battleships Kongō and Haruna bombarded the airfield on Guadalcanal with 918 14-inch (36 cm) rounds, destroying over 40 aircraft and putting the airfield temporarily out of commission.[47] (Mark Stille notes that despite Japan's prewar preoccupation with a titanic clash of battleships, this was the most successful Japanese battleship operation of the war.[47]) The convoy arrived during the night of October 14–15, preceded by two heavy cruisers which shelled the airfield. Aircraft from two carriers flew cover over the transports. American aircraft succeeded in sinking three of the six transports, but not before a total of 4,500 men had landed along with two-thirds of their supplies and equipment.[47] The Japanese kept up the pressure with another cruiser bombardment on the night of October 15–16 and more reinforcement destroyer runs. After several delays, the Japanese began the offensive on October 24. The main attack finally commenced on the night of October 25–26, but the attacks on Henderson field were repulsed by the Marines with heavy losses.[48]
Santa Cruz

Concurrently with the Army's offensive on Guadalcanal, the IJN planned their largest naval operation to date in order to counter and defeat any American naval forces operating in support of the Marines on Guadalcanal.[48] The Combined Fleet departed Truk on October 11 with a force of four battleships, four carriers, nine cruisers, and 25 destroyers. In addition, the Eighth Fleet in Rabual contributed four more cruisers and 16 destroyers. On October 25, Yamamoto ordered the Combined Fleet to engage the Americans. Just after midnight on the night of 25–26 October, an American PBY patrol aircraft located the Japanese fleet. Finding the Japanese force just before dawn, two SBDs dive-bombers from the Enterprise attacked Zuihō and scored a pair of hits that damaged the flight deck, starting numerous fires on board the carrier. However, the Japanese had already launched a sixty-five aircraft strike against the American task force. Through a ring of antiaircraft fire and the carriers fighter cover, the Japanese dive and torpedo bombers registered a number of hits on Hornet. By 9.30 am Hornet was dead in the water, but planes from the Hornet had also located the Japanese. Six American bombs struck the deck of Shōkaku, removing her from the battle. Some Hornet SBSs attacked the heavy cruiser Chikuma, damaging her so severely that she was forced to return to the port at Truk. The Battle of Santa Cruz was the fourth carrier clash of the war.[48] The Japanese managed to sink the carrier Hornet , damaged Enterprise, a battleship, a cruiser, and a destroyer. Yamamoto ordered his subordinates to seek a night battle to finish off the fleeing Americans, but their fuel situation forced them to return to Truk by October 30. Although American losses had been high, the Japanese had been turned back.[48] Two Japanese carriers were heavily damaged and carrier air groups had also been decimated with the greatest single loss of carrier aircrews to date, 148 aviators.[49] These losses prevented the Japanese from exploiting their success.[48]
Failure to take Guadalcanal
The battle for Guadalcanal reached a crescendo in November. After the victory at Santa Cruz, the Japanese were sure that the naval balance in the south Pacific had swung in their favor.[50] They planned a more substantial effort to reinforce the island. A similar plan to the one conducted in October was put forward, with a larger convoy preceded by another bombardment by battleships to neutralize the airfield. The Japanese were prepared to employ sufficient forces to guarantee its success. On the night of November 12–13, a force of two battleships, Hiei and Kirishima, one light cruiser and 11 destroyers departed for Guadalcanal to bombard the airfield. However, this attempt was thwarted by a smaller American force of five cruisers and eight destroyers, which intercepted the Japanese force. A vicious night action ensued at close range.[50] Losses were heavy on both sides, but the critical bombardment of the airfield never occurred.[50] Hiei was damaged and the following day was sunk by American aircraft, becoming the first Japanese battleship to be lost in the war.[50] The Japanese then attempted another bombardment with a force centering on the battleship Kirishima, with support from two heavy cruisers and two destroyer squadrons. The IJN had additional battleships that were available, but were not employed.[50] On the night of November 14–15, this attempt was again met by the American force which included two battleships, Washington and South Dakota. In another vicious night battle, the Japanese were again turned back, losing the battleship Kirishima during the first battleship duel of the Pacific War.[50] These two night battles became known as the First and Second Naval Battles of Guadalcanal. They were the decisive events of the campaign.[50] While the Americans had delivered large numbers of additional troops to Guadalcanal, the Japanese only delivered 2,000 troops and an insignificant amount of supplies.[50] Additionally, the large Japanese convoy had lost all ten transports, which had been sunk by American aircraft from the undamaged airfield.[50] Naval losses were heavy for both sides; the Americans lost two cruisers and seven destroyers and many ships had been severely damaged. The Japanese lost two battleships, a heavy cruiser, and three destroyers. The Japanese had been defeated more by a failure to mass their forces rather than by being outfought.[50] The attrition suffered by the Japanese during the battles for Guadalcanal was too great. On January 4, the Navy Section of the Imperial General Headquarters instructed Yamamoto to prepare the withdrawal of the remaining troops from Guadalcanal.[50] The evacuation of Guadalcanal was codenamed Operation Ke.[50] The Americans detected the preparations for the operation and believed they were actually for another Japanese attempt to reinforce the island. The evacuation was carefully planned to take place in three destroyer lifts and would begin in late January 1943.[50] The first operation was conducted with 20 destroyers on February 1, another with 20 destroyers was conducted on February 4. A third and final operation was conducted with 18 destroyers on February 7.[51] Operation Ke was successful and 10,652 men, were evacuated from Guadalcanal, with Japanese losses only being a single destroyer.[51]
Central Solomons and New Guinea
With Guadalcanal lost, the Japanese focus shifted to the Central Solomons and New Guinea. However, during the Battle of the Bismarck Sea on March 2–4, an Allied air attack destroyed a convoy attempting to move troops from Rabaul to Lae on New Guinea.[51] To rectify Japan's declining position, Yamamoto devised a major air offensive to counter the growing Allied strength in the Solomons. He moved the air groups of the Combined Fleet's four carriers of about 160 aircraft, to Rabaul to join the 190 aircraft of the Eleventh Air Fleet. This brought the Japanese air strength there to some 350 aircraft. The air offensive was codenamed Operation I-Go, consisting of four major attacks conducted on Allied positions on Guadalcanal, Buna, Port Moresby and Milne Bay on April 7, 11, 12 and 14, respectively.[52] In mid-April, the IJN concluded the operation, claiming success against Allied shipping and defending fighters. In fact, little had been achieved and Japanese losses were heavier than those suffered by the Allies,[52] resulting in further attrition to the vital Japanese carrier aircrews.[52] During 1943, the IJN attempted to preserve its strength in the face of two attack routes by the Americans. In the Solomons, the action turned to the Central and Northern Solomons between March and November. During this period, the Japanese and Americans fought seven surface engagements. All of these actions were fought at night during which the Japanese still enjoyed an advantage. Twice, Japanese destroyers defeated an Allied force composed of cruisers and destroyers, demonstrating the Japanese prowess at night fighting.[52]
In early August, at Vella Gulf, three out of four Japanese destroyers were sunk by American destroyers using radar with a new doctrine that emphasized torpedo attacks.[53] It was the first time in the war that Japanese destroyers had been beaten during a night battle.[53] The next action, fought on August 18, was indecisive. On October 6, the two sides met again. Japanese torpedoes shattered the American formation, but the Japanese did not follow up their advantage, with one destroyer sunk from each side.[53] On November 2, the Japanese committed two heavy cruisers, two light cruisers, and six destroyers to attack the American beachhead on Bougainville Island. In another night action, this time at Empress Augusta Bay, an American force of four light cruisers and eight destroyers intercepted the Japanese and defeated them, sinking a light cruiser and a destroyer. Americans suffered no losses, with a single destroyer damaged. The Japanese had lost their tactical advantage in night engagements.[53] Adding to their predicament was the increasing Allied strength in the region, demonstrated when the Second Fleet arrived at Rabaul on November 5 with six heavy cruisers to engage American naval forces off Bougainville; they were immediately subjected to an attack by carrier aircraft. Four of the cruisers were damaged and forced to return to Japan for repairs and the operation ended as a complete fiasco.[53] This marked the end of major IJN operations in the South Pacific and the end of Rabaul as a major base. The conclusion that the IJN had lost its edge in night combat was confirmed later in November at Cape St George, when a force of American destroyers intercepted five Japanese destroyers, sinking three of them to no loss.[53]
Collapse of the defensive perimeter (1943–44)
Admiral Isoroku Yamamoto had been killed on April 18, 1943. The following day, Admiral Mineichi Koga succeeded Yamamoto as Commander-in-Chief of the Combined Fleet.[54] In May 1943, the Japanese prepared Operation Z or the Z plan, which envisioned the use of the IJN to counter American forces threatening the Japanese outer defense perimeter. This line extended from the Aleutians down through Wake, the Marshall and Gilbert Islands, Nauru, the Bismarck Archipelago, New Guinea, then westward past Java and Sumatra to Burma.[54] In 1943–44, Allied forces in the Solomons began driving relentlessly to Rabaul, eventually encircling and neutralizing the stronghold. With their position in the Solomons disintegrating, the Japanese modified the Z Plan by eliminating the Gilbert and Marshall Islands and the Bismarcks as vital areas to be defended. They then based their possible actions on the defense of an inner perimeter, which included the Marianas, Palau, Western New Guinea, and the Dutch East Indies. Meanwhile, in the Central Pacific a major American offensive was initiated, beginning in November 1943 with landings in the Gilbert Islands.[53] The Japanese were forced to watch helplessly as their garrisons in the Gilberts and then the Marshalls were crushed.[53] The Japanese strategy of holding overextended island garrisons was fully exposed.[55]
In February 1944, the US Navy's fast carrier task force attacked the major Japanese naval base of Truk during Operation Hailstone. Although the Combined Fleet had moved its major vessels out in time to avoid being caught at anchor in the atoll, two days of air attacks resulted in significant losses to Japanese aircraft and merchant shipping. The power of the American attack on Truk far surpassed that of the Japanese attack against Pearl Harbor.[55] The IJN was forced to abandon Truk and was now unable to stop the Americans on any front. Consequently, the Japanese retained their remaining strength in preparation for what they hoped would be a decisive battle.[55]
Though the Japanese had been leaders in carrier development, at the beginning of the war many of the IJN's top commanders were still battleship or "Big Gun" adherents.[56] However, by early 1944 these commanders had finally accepted the fact that the carrier was the new capital ship. This realization brought with it a change in fleet organization. On March 1, 1944, the First Mobile Fleet was created under the command of Vice Admiral Jisaburo Ozawa. Instead of remaining in separate fleets, most of the front-line battleships, cruisers, and destroyers joined the carriers in the Mobile Fleet. The Japanese finally accepted the concept of entrusting the tactical command of a task force to a carrier admiral. This had been adopted by the Americans almost two years earlier.[56]
Admiral Koga survived slightly less than a year as the Commander-in-Chief of Combined fleet. In March 1944, while en route to the Philippines from Palau, his plane disappeared in a storm. Koga's chief of staff, Admiral Shigeru Fukudome, had also left Palau on a separate plane and flew into the same storm. His plane crashed near Cebu, and he was captured by Filipino guerrillas with his documents. Although the guerrillas were quickly forced to give up their prisoner, the documents and their coding system found their way to Allied intelligence via an American submarine.[56] After recovering Fukudome, the Japanese realized that their planned operations were compromised and they needed a new one. Admiral Shigetaro Shimada, the Chief of the Naval Staff in Tokyo, immediately began preparing a new plan, which was based on a preliminary draft by Admiral Koga. This plan became known as A-GO. A-GO envisioned a decisive fleet action, where the areas for the decisive battle were deemed to be the Palaus and the Western Carolines.[56] It was in these areas that the Mobile Fleet, along with large numbers of land-based aircraft, would be concentrated. If the Americans attacked the Marianas, they would be attacked by land-based planes in that vicinity. Then the Americans would be lured into the areas where the Mobile Fleet could defeat them.[56] A month after Koga's death, Admiral Soemu Toyoda become the new commander of Combined Fleet.[56]
Philippine Sea
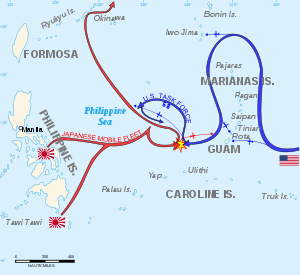
An opportunity for a decisive battle came in June 1944, when the Americans landed on Saipan in the Marianas. The Japanese responded with their largest carrier force of the war, the nine-carrier Mobile Fleet, led by Shōkaku, Zuikaku, and the new armored-deck aircraft carrier Taihō. The resulting clash, the largest carrier battle in history, did not turn out as the Japanese had hoped. Instead, it ended in near-total defeat and the virtual end of their carrier force.[57]
On June 19, a series of Japanese carrier air strikes were shattered by strong American defenses. The same day, Shōkaku was hit by four torpedoes from the submarine Cavalla and sank with heavy loss of life. Taihō, the most modern carrier, was also sunk due to a single torpedo hit from the submarine Albacore. Late the next day, the Japanese were subjected to American carrier air attack, suffering the loss of several ships, including the carrier Hiyō.[55] The four Japanese air strikes had involved 373 carrier aircraft, of which only 130 returned.[58] More aircraft and their crews were lost when Taihō and Shōkaku were sunk. After the second day of the battle, Japanese losses were 3,000 dead, three carriers, two fleet oilers, more than 400 carrier aircraft, and around 200 land-based aircraft, plus damage to several ships. The Americans suffered the loss of 109 dead, 123 aircraft (80 of which ran out of fuel returning from the strike on the Japanese fleet), and bomb damage to the battleship South Dakota.
Although this defeat was severe in terms of the loss of the fleet carriers Taihō, Shōkaku, and Hiyō, the real disaster was the annihilation of the carrier air groups.[59] These losses to the already-outnumbered IJN were irreplaceable. The IJN had spent the better part of a year reconstituting their carrier air groups. The Americans destroyed 90% of that airpower in two days, leaving the Japanese with only enough aircrew to form an air group for one light carrier, returning home with 35 of about 450 aircraft with which the Mobile Fleet had begun the battle.[55]
Leyte Gulf

Even after the disaster at Philippine Sea, the IJN was still a formidable force. Of the 12 battleships that were available at the beginning of the war in 1941–42, nine still remained operational, together with 14 out of the original 18 heavy cruisers.[55] However, efforts to rebuild the carrier force were unsuccessful since the training given to new aviators was of a very low standard. Consequently, the new Unryū carriers never went to sea with a full air group. This left the Japanese with a ragtag collection of carriers, led by Zuikaku, which was the sole survivor of the Pearl Harbor attack force. The Japanese were left with two choices: either commit their remaining strength in an all-out offensive, or sit by while the Americans occupied the Philippines and cut the sea lanes between Japan and vital resources from the Dutch East Indies and Malaya. The plan devised by the IJN was a final attempt to create a decisive battle using its last remaining strength, the firepower of its heavy cruisers and battleships, which were to be all committed against the American beachhead at Leyte. The Japanese planned to use their remaining carriers as bait, in order to lure the American carriers away from Leyte Gulf long enough for the heavy warships to enter and destroy any American ships present.
The Japanese assembled a force totaling four carriers, nine battleships, 13 heavy cruisers, seven light cruisers, and 35 destroyers.[60] The main Center Force would pass through the San Bernardino Strait into the Philippine Sea, turn southwards, and then attack the landing area. Two separate groups of the Southern Force would strike at the landing area through the Surigao Strait, while the Northern Force with the carriers was to lure the main American covering forces away from Leyte.[60] However, the carriers only embarked just over 100 aircraft, the equal to those on a single American fleet carrier; the Japanese were risking annihilation. The situation in 1944 revealed the weakness of the IJN. After departing from Brunei Bay on October 20, the Center Force was attacked by two American submarines which resulted in the loss of two heavy cruisers with another crippled. On the night of October 24–25, the Southern Force, consisting of the two Fusō-class battleships escorted by a heavy cruiser and four destroyers, attempted to enter Leyte Gulf from the south through Surigao Strait. This action was fought at night, where an American force of six battleships, eight cruisers, 28 destroyers, and 39 PT boats ambushed the Japanese.[61] Utilizing radar-guided torpedo attacks, American destroyers sank one battleship and three destroyers while damaging the other battleship. Naval gunfire finished off the second battleship and the heavy cruiser, with only a single Japanese destroyer surviving. Another group, part of the Southern Force, was built around two heavy cruisers. This force failed to coordinate its movements with the first and subsequently arrived at Surigao Strait in the middle of the encounter, made a haphazard torpedo attack, and retreated.[61]

That day, after entering the Sibuyan Sea, the Center Force was assaulted by American carrier aircraft throughout the whole day, forcing another heavy cruiserto retire. The Americans then targeted Musashi and sank her under a barrage of torpedo and bomb hits. Many other ships of the Center Force were attacked, but continued on.[60] Convinced that their attacks had made the Center Force ineffective, the American carriers headed north to address the newly detected threat of the Japanese carriers. Off Cape Engaño, the Americans launched over 500 aircraft sorties at the Japanese force, followed up by a surface group of cruisers and destroyers. All four Japanese carriers were sunk, but this part of the Leyte plan had succeeded in drawing the American carriers away from Leyte Gulf.[61] On October 25, the final major surface action fought between the Japanese and Americans fleets during the war occurred off Samar, when the Center Force fell upon a group of American escort carriers escorted by only destroyers and destroyer escorts. Both sides were surprised, but the outcome looked certain since the Japanese had four battleships, six heavy cruisers, and two light cruisers leading two destroyer squadrons. However, they did not press home their advantage, and were content to conduct a largely indecisive gunnery duel before breaking off. In exchange for the loss of three heavy cruisers, Center Force sank a single escort carrier and three escorts. Losses were extremely heavy with four carriers, three battleships, six heavy cruisers, four light cruisers and eleven destroyers sunk. This represented a total of 305,452 tons or 13.22 percent of the total Japanese warship tonnage losses during the war.[62]
After Leyte Gulf, the IJN was finished as an effective force. The IJN was left with six battleships Hyuga, Ise, Nagato, Haruna, Kongo and Yamato; five fleet carriers Junyo, Shinano (never operational), Amagi, Katsuragi and the Unryu; the light carrier Ryuho; the escort carriers Kaiyo and Shinyo; the training carrier Hosho; eight heavy cruisers Aoba, Ashigara, Haguro, Myoko, Nachi, Takao, Kumano and Tone; nine light cruisers Kitakami, Kiso, Isuzu, Kashima, Kashii, Yahagi, Sakawa, Oyodo and the Yasoshima; and some twenty destroyers plus escorts, minesweepers, and patrol vessels.[63]
Last Sortie
American forces landed on Okinawa on April 1. The Imperial General Headquarters decided to use every available resource to dislodge the enemy.[64] A force, called Ten-Go, consisting of the battleship Yamato, the light cruiser Yahagi and eight destroyers; Isokaze, Hamakaze, Yukikaze, Asashimo, Kasumi, Hatsushimo, Fuyuzuki and Suzutsuki, was assembled. Under the command of Vice-Admiral Seiichi Itō, the force was to be used as bait to draw away as many American carrier aircraft as possible, in order to leave Allied naval forces off Okinawa vulnerable against large scale kamikaze attacks.[64] The IJN was so short of fuel that Yamato had only enough to reach Okinawa. Off Okinawa, it was planned to beach the battleship and use her 18.1 inches (46 cm) guns to support the fighting on the island.[64] Many of the captains of the ships were opposed to the operation, preferring to be set loose as sea raiders.[64]
The force departed Tokuyama on April 6 at 16:00. At 04:00 on April 7, the Japanese force passed the Ōsumi Peninsula into the open ocean heading south from Kyūshū. The force had defensive formation, with Yahagi leading Yamato and the eight destroyers deployed in a ring around the two larger ships, with each ship 1,500 m (1,600 yd) from each other and proceeding at 20 kn (23 mph; 37 km/h). At 09:00, the destroyer Asashimo developed engine trouble and dropped out of line.[64] At 11:15 the force turned southwest towards Okinawa. However, 15 minutes later the Japanese were sighted by American reconnaissance aircraft. All catapult aircraft on board the warships were ordered back to Kyūshū.[64]
At 12:32 some 175 miles (282 km) south of Kyūshū, the force was attacked by large numbers of American carrier aircraft. The waves of aircraft were continuous.[65] Yahagi, Hamakaze and Isokaze were battered by torpedoes and bombs and sunk. Yamato suffered heavy damage and by 14:05 she started to list. A final torpedo forced her to list further and caused an explosion which sent smoke billowing upwards, sinking her.[65] Asashimo fell behind and was also sunk. Four destroyers, Fuyuzuki, Suzutsuki, Yukikaze and Hatsushimo managed to return to Sasebo.[65] A total of 3,665 men were lost.[nb 4]
Warships
Battleships

Japan continued to attribute considerable prestige to battleships (戦艦 Senkan) and endeavoured to build the largest and most powerful ships of the period. Yamato, the heaviest and most heavily armed battleship in history, was launched in 1941.[66] However, they only managed to complete Yamato and Musashi, while the third member of the class Shinano was converted to an aircraft carrier and sunk before completion. As a result of the changing technology as well as unexpected heavy losses in aircraft carriers in 1942, plans for even larger battleships, such as the Japanese Super Yamato-class battleships, were cancelled.
The second half of World War II saw the last battleship duels. In the Battle of Guadalcanal on 15 November 1942, the U.S. battleships USS South Dakota and Washington fought and sank the Japanese battleship Kirishima, at the cost of moderate topside damage to South Dakota. For the Battle of Leyte Gulf the Japanese had to use their battleships as the main combatants, due to the heavy losses in their carrier air wings suffered in the earlier Battle of the Philippine Sea, which relegated the carriers to decoys. On 25 October 1944 six battleships, led by Rear Admiral Jesse Oldendorf of the U.S. 7th Fleet, fired upon and claimed credit for sinking Vice Admiral Shoji Nishimura's battleships Yamashiro and Fusō during the Battle of Surigao Strait; in fact, both battleships were fatally crippled by torpedo attacks from destroyers before being brought under fire by Oldendorf's battleships, and probably only Yamashiro was the target of their fire.
Thanks to the Japanese carriers' successfully decoy role, the Battle off Samar on 25 October 1944 during the Battle of Leyte Gulf showed battleships could still be useful. However, persistent American air attacks, coupled with the indecision of Vice Admiral Takeo Kurita and tenacity shown by American destroyers and destroyer escorts saved the American escort carriers of "Taffy 3" from destruction by the gunfire of Yamato, Kongō, Haruna, and Nagato and their cruiser escort. Miraculously for the Americans, only one escort carrier, two destroyers, and one destroyer escort were lost in this action.
Ultimately, the maturity of air power spelled doom for the battleship. Battleships in the Pacific ended up primarily performing shore bombardment and anti-aircraft defense for the carriers. Only the fast battleships (formerly battlecruisers) of the Kongo class saw much action due to their speed, while the slower and heavier battleships were held in reserve for a decisive engagement of battleships versus battleships which never happened. Yamato and Musashi were sunk by air attacks long before coming in gun range of the American fleet.[67]
Aircraft carriers

In the 1920s, the Kaga (originally laid down as a battleship) and a similar ship, the Akagi (originally laid down as a battlecruiser) were converted to aircraft carriers (航空母艦 Kōkūbokan) to satisfy the terms of the Washington Naval Treaty.[68] From 1935 to 1938, Akagi and Kaga received extensive rebuilds to improve their aircraft handling capacity.[68]
Japan put particular emphasis on aircraft carriers. The Imperial Japanese Navy started the Pacific War with 10 aircraft carriers,[69] the largest and most modern carrier fleet in the world at that time. There were eight American aircraft carriers at the beginning of hostilities,[70] only three operating in the Pacific; and eight British aircraft carriers, of which a single one operated in the Indian Ocean. A large number of these Japanese carriers were of small size, however, in accordance with the limitations placed upon the Navy by the London and Washington Naval Conferences. Nonetheless, the Japanese initially had the upper hand over the American and British, by grouping all of their fleet carriers into a single unit known as the 1st Air Fleet or Kidō Butai ("Mobile Force"). In the Kidō Butai, the two Shōkaku-class carriers were superior to any carrier in the world, until the wartime appearance of the American Essex class.[nb 5]
Following the Battle of Midway, in which four Japanese fleet carriers were sunk, the IJN suddenly found itself short of fleet carriers (as well as trained aircrews), robbing them of a strategic offensive capability. The IJN consequently undertook an ambitious set of projects to convert commercial and military vessels into carriers, such as the Hiyō. Another conversion project, Shinano, was based on an incomplete Yamato-class super battleship and became the largest-displacement carrier of World War II. One exception was the Taihō, which was the only Japanese carrier with an armored flight deck and first to incorporate a closed hurricane bow. All three mid-war designs were sunk in 1944, with Shinano and Taihō being sunk by U.S. submarines, and Hiyō by air attacks. The IJN also attempted to build a number of fleet carriers called the Unryū-class, mostly based on the older Hiryū design rather than the newer Shōkaku or Taihō for the sake of reducing construction cost and time. Most carriers were still under construction or cancelled by the end of the war, while the few completed ships never embarked air groups due to severe shortages of carrier-qualified aircrew.
Destroyers
Japanese World War II destroyers (駆逐艦 Kuchikukan) included some of the most formidable destroyers of their day. This came as a nasty surprise to the Allies, who had generally underestimated Japanese technical capabilities. The Japanese had reassessed their naval needs in the mid-1920s and, placing an emphasis on ship and weapons technology and night fighting expertise, developed a completely new destroyer design. Subsequent development from one destroyer class to the next was not, however, a smooth progression. Aside from the usual changes arising from experience, serious design faults also came to light and naval treaties imposed restrictions. As a result, the early "Special Type" destroyers required significant changes and the specifications of subsequent classes was reduced in one way or another. Naval treaties were later abrogated in 1937 and so destroyer development continued without regard to limits.
Generally speaking, the Imperial Japanese Navy (IJN) requirements gave rise to warships that were substantially larger than their European or American equivalents, often well-equipped with heavy torpedo armament for surface engagements but with less emphasis on anti-aircraft or anti-submarine armament. In the early war years, their advantages were exploited against the often second rate and poorly coordinated Allied ships stationed in the region such as at the IJN victory in the Battle of the Java Sea. The Japanese did not, however, continue to install new technology, such as radar, to match their opponents, and destroyer numbers were eroded steadily in the latter half of the Pacific War. The Japanese emphasis on capable but expensive fleet destroyers had neglected the need for large numbers of cheaper escort vessels (destroyer escorts or frigates) to defend critical merchantmen, a need learnt by both the Royal Navy and the United States Navy in the Battle of the Atlantic. In recognition that quantity was as important as quality in some roles, design policy was therefore modified to produce units that were easier to build and operate. Despite this, Japan's destroyer force was halved by the end of the war. The survivors were given to the Allies.

Japan began the war with a highly competent naval air force designed around some of the best airplanes in the world: the A6M Zero was considered the best carrier aircraft of the beginning of the war, the Mitsubishi G3M bomber was remarkable for its range and speed, and the Kawanishi H8K was the world's best flying boat.[nb 6] The Japanese pilot corps at the beginning of the war were of high caliber as compared to their contemporaries around the world due to intense training and frontline experience in the Sino-Japanese War.[nb 7] The Navy also had a competent land-based tactical bombing force based around the Mitsubishi G3M and G4M bombers, which astonished the world by being the first planes to sink enemy capital ships underway, claiming battleship Prince of Wales and the battlecruiser Repulse.[7]
As the war progressed, the Allies found weaknesses in Japanese naval aviation. Though most Japanese aircraft were characterized by great operating range and agility, they had very little in the way of defensive armament and armor.[73] As a result, the more numerous, heavily armed and armored American aircraft were able to develop techniques that nullified the advantages of the Japanese aircraft. The early carrier versus carrier naval battles in 1942 such as Coral Sea and Santa Cruz Island were tactical victories for the IJN but they suffered disproportionately high aircrew losses compared to the US Navy. The IJN did not have an efficient process for rapid training of aviators, as two years of training were usually considered necessary for a carrier flyer. Therefore, they were not able to effectively replace seasoned pilots lost through combat attrition following their initial successes in the Pacific campaign.[73] The inexperience of IJN pilots who were trained in the later part of the war was especially evident during the Battle of the Philippine Sea, when their aircraft were shot down in droves by the American naval pilots in what the Americans later called the "Great Marianas Turkey Shoot". Following the Battle of Leyte Gulf, the Japanese Navy increasingly opted towards deploying aircraft in the kamikaze role.

Although there were delays in engine development,[74] several new competitive aircraft designs were developed during the war, but industrial weaknesses, lack of raw materials and disorganization due to Allied bombing raids hampered their mass-production. Towards the end of the conflict, several competitive plane designs were developed, such as the 1943 Shiden, but such planes were produced too late and in insufficient numbers (415 units for the Shiden) to affect the outcome of the war.[75] Radical new plane designs were also developed, such as the canard design Shinden, and especially jet-powered aircraft such as the Nakajima Kikka and the rocket-propelled Mitsubishi J8M Shusui. These jet designs were partially based on technology received from Nazi Germany, usually in the form of a few drawings only (Kikka being based on the Messerschmitt Me 262 and the J8M on the Messerschmitt Me 163), so Japanese manufacturers had to play a key role in the final engineering.[76] These developments also happened too late in the conflict to have any influence on the outcome. The Kikka only flew twice before the end of the war.[77]
Submarines

Japan had by far the most varied fleet of submarines of World War II, including manned torpedoes (Kaiten), midget submarines (Ko-hyoteki, Kairyu), medium-range submarines, purpose-built supply submarines (many for use by the Army), long-range fleet submarines (many of which carried an aircraft), submarines with the highest submerged speeds of the conflict (Senkou I-201), and submarines that could carry multiple bombers (World War II's largest submarine, the Sentoku I-400). These submarines were also equipped with the most advanced torpedo of the conflict, the Type 95 torpedo, a 533 mm (21 in) version of the famous 610 mm (24 in) Type 93.[78]
A plane from one such long-range fleet submarine, I-25, conducted the only aerial bombing attack on the continental United States when Warrant Flying Officer Nobuo Fujita attempted to start massive forest fires in the Pacific Northwest outside the town of Brookings, Oregon on September 9, 1942.[79] Other submarines undertook trans-oceanic yanagi missions to German-occupied Europe, such as I-30, I-8, I-34, I-29 and I-52, in one case flying a Japanese seaplane over France in a propaganda coup.[80] In May 1942, Type A midget submarines were used in the attack on Sydney Harbour and the Battle of Madagascar.
| Sinking of merchant shipping, during World War II[81] | |||
| Submarines (number) |
Ships sunk (number) |
Tonnage sunk (tons) | |
| Germany | 1,000 | 2,000 | 14.5 million |
| United States | 316 | 1,079 | 4.65 million |
| Britain | 250 | 493 | 1.5 million |
| Japan | 184 | 170 | 1 million |
Overall however, Japanese submarines were relatively unsuccessful.[81] They were often used in offensive roles against warships (in accordance with Mahanian doctrine), which were fast, maneuverable and well-defended compared to merchant ships. In 1942, Japanese submarines managed to sink two fleet carriers (Yorktown and Wasp), one cruiser (Juneau), and a few destroyers and other warships, and damage several others (aircraft carrier Saratoga).[81] They were not able to sustain these results afterwards, as Allied fleets were reinforced and started using better anti-submarine tactics including those learned from the Battle of the Atlantic. By the end of the war, submarines were instead often used to transport supplies to island garrisons. During the war, Japan managed to sink about 1 million tons of merchant shipping (170 ships) with her 184 submarines, compared to 1.5 million tons for Britain (493 ships), 4.65 million tons for the US (1079 ships)[82] and 14.5 million tons for Germany (2,000 ships) with 1,000 U-boats.[81]
Early models were not very maneuverable under water, could not dive very deep, and lacked radar. Later in the war, units fitted with radar were in some instances sunk due to the ability of US radar sets to detect their emissions. For example, USS Batfish sank three such in the span of four days. After the end of the conflict, several of Japan's most innovative and advanced submarines were sent to Hawaii for inspection in "Operation Road's End" (I-400, I-401, I-201 and I-203) before being scuttled by the U.S. Navy in 1946 when the Soviets demanded access to the submarines as well.[83]
Special Attack Units

At the end of World War II, numerous Special Attack Units (Japanese: 特別攻撃隊, tokubetsu kōgeki tai, also abbreviated to 特攻隊, tokkōtai) were developed for suicide missions, in a desperate move to compensate for the annihilation of the main fleet.[84] These units included Kamikaze ("Divine Wind") bombers,[84] Shinyo ("Sea Quake") suicide boats,[85] Kairyu ("Sea Dragon") suicide midget submarines,[86] Kaiten ("Turn of Heaven") suicide torpedoes,[85] and Fukuryu ("Crouching Dragon") suicide scuba divers who would swim under boats and use explosives mounted on bamboo poles to destroy both the boat and themselves.[85] Kamikaze planes were particularly effective during the defense of Okinawa, in which about 2,000 planes were sent to sink 34 warships and damage around 364.[87]
A considerable number of Special Attack Units were built and stored in coastal hideouts for the desperate defense of the Home islands, with the potential to destroy or damage thousands of enemy warships.[85]
The Imperial Japanese Navy Land Forces of World War II originated with the Special Naval Landing Forces, and eventually consisted of the following:
- Special Naval Landing Force or Rikusentai or kaigun rikusentai or Tokubetsu Rikusentai: the Japanese Marines
- The Base Force or Tokubetsu Konkyochitai provided services, primarily security, to naval facilities
- Defence units or Bobitai or Boei-han: detachments of 200 to 400 men.
- Guard forces or Keibitai: detachments of 200–500 men who provide security to Imperial Japanese Navy facilities
- Pioneers or Setsueitai built naval facilities, including airstrips, on remote islands.
- Naval Civil Engineering and Construction Units, or Kaigun Kenchiku Shisetsu Butai
- The Naval Communications Units or Tsushintai of 600–1,000 men to provide basic naval communications and also handled encryption and decryption.
- The Tokkeitai Navy military police units were part of the naval intelligence armed branch, with military police regular functions in naval installations and occupied territories; they also worked with the Imperial Japanese Army's Kempeitai military police, the Keishicho civil police and Tokko secret units in security and intelligence services.
Personnel strength
- December 1941 — 291,359 including 1,500 pilots
- July 1945 — 1,663,223
See also
- Imperial Japanese Army during the Pacific War
- Imperial Japanese Navy in World War I
- Imperial Japanese Navy order of battle 1941
- List of Japanese Navy ships and war vessels in World War II
- List of ships of the Second World War
- Naval history of World War II
- Osaka Guard District
Notes
- ^ Skilled ground crew and aircraft maintenance personnel may have accounted for twenty six hundred of the three thousand personnel who went down with the four carriers.[40] The loss of 40% of the four carriers' highly trained aircraft mechanics and technicians, including the essential flight-deck crews etc., together with the loss of organizational knowledge exemplified in such highly trained crews, were a blow to the IJN.[41]
- ^ Prados notes the most significant shortfall was in single-engine attack aircraft (dive bombers and torpedo planes) where 374 were lost against the induction of 240 new planes. Commander Okumiya Masatake, an air staff officer and experienced pilot, also recorded that at mid-July 1942 the order of battle for Japanese naval aviation was slightly stronger in fighters than before the war, though it had declined by roughly a quarter in attack aircraft. Land-based medium-bomber strength was actually greater than it had been at the start of the war.[45]
- ^ During Midway more than a hundred aircrew and pilots were killed, with the bulk lost concentrated among the carrier attack squadrons. The IJNAS had begun the war with nearly 2,000 pilots, almost all of them highly skilled and about half being carrier qualified. Most of the initial cadre had more than 600 hours of flying experience, many of them expert pilots with thousands of hours in the air including combat experience in China. In comparison, a typical USAAF pilot in the autumn of 1942 went to the front line with 300 flight hours. The IJN would train about 2,000 new pilots in 1942. That summer, when the campaign in the Solomons began, an estimated over 85 percent of naval pilots still met the expert standard of more than 600 flying hours.[45]
- ^ 2,498 on board Yamato, 446 on Yahagi, and 721 on board the four destroyers.[65]
- ^ "In many ways the Japanese were in the forefront of carrier design, and in 1941, the two Shōkakus — the culmination of prewar Japanese design — were superior to any carrier in the world then in commission"[69]
- ^ "For speed and maneuverability, for example the Zero was matchless; for range and speed few bombers surpassed the Mitsubishi G3M, and in the Kawanishi H8K, the Japanese navy had the world's best flying boat"[71]
- ^ "by 1941, by training and experience, Japan's naval aviators were undoubtedly the best among the world's three carrier forces"[72]
References
- ^ Evans & Peattie 1997, p. 496.
- ^ Jentschura, "Warships of the Imperial Japanese Navy, 1869–1945", pp. 25–60, 79–87, 104–113, ISBN 978-0-87021-893-4
- ^ Stille 2014, p. 8.
- ^ Stille 2014, p. 9.
- ^ a b c d Evans & Peattie 1997, p. 488.
- ^ a b c Evans & Peattie 1997, p. 489.
- ^ a b Peattie 2007, p. 169.
- ^ Peattie 2007, p. 172.
- ^ Evans & Peattie 1997, p. 490.
- ^ a b c d e Evans & Peattie 1997, p. 491.
- ^ Peattie 2007, pp. 188–189.
- ^ a b c Evans & Peattie 1997, p. 492.
- ^ Evans & Peattie 1997, p. 502.
- ^ Stille 2014, p. 12; Evans & Peattie 1997, p. 141.
- ^ a b c d e Stille 2014, p. 12.
- ^ Evans & Peattie 1997, p. 143.
- ^ a b c d Stille 2014, p. 25.
- ^ a b c d e f Stille 2014, p. 27.
- ^ a b c d e Stille 2014, p. 29.
- ^ a b c d Stille 2014, p. 28.
- ^ Stille 2014, p. 28; Dull 2013, p. 17.
- ^ Evans & Peattie 1997, p. 488; Dull 2013, p. 19.
- ^ Evans & Peattie 1997, p. 488; Peattie 2007, p. 168.
- ^ a b Dull 2013, p. 104.
- ^ Dull 2013, p. 111.
- ^ a b c Stille 2014, p. 30.
- ^ a b c d e Stille 2014, p. 31.
- ^ a b Willmott 1983, p. 118.
- ^ Stille 2014, pp. 31–32.
- ^ a b c d e Stille 2014, p. 32.
- ^ Stille 2014, pp. 32–34.
- ^ a b c d Stille 2014, p. 34.
- ^ Stille 2014.
- ^ Stille 2014, p. 35; Parshall & Tully 2005, pp. 43–44.
- ^ Stille 2014, p. 35.
- ^ a b Stille 2014, p. 36.
- ^ a b Stille 2014, p. 37.
- ^ Stille 2014, p. 37; Parshall & Tully 2005, p. 232.
- ^ Stille 2014, p. 38; Willmott 2002, pp. 89–90.
- ^ Peattie 2007, p. 175; Prados 2012, p. 10.
- ^ Parshall & Tully 2005, pp. 416–417 & 432.
- ^ Peattie 2007, p. 174.
- ^ a b Peattie 2007, p. 175.
- ^ Parshall & Tully 2005, p. 417.
- ^ a b c d e Prados 2012, p. 10.
- ^ a b c d e Stille 2014, p. 38.
- ^ a b c d e f g h Stille 2014, p. 39.
- ^ a b c d e Stille 2014, p. 42.
- ^ Peattie 2007, p. 180.
- ^ a b c d e f g h i j k l m Stille 2014, p. 43.
- ^ a b c Stille 2014, p. 44.
- ^ a b c d Stille 2014, p. 45.
- ^ a b c d e f g h Stille 2014, p. 46.
- ^ a b Y'Blood 1981, p. 14.
- ^ a b c d e f Stille 2014, p. 47.
- ^ a b c d e f Y'Blood 1981, p. 15.
- ^ Stille 2014, p. 76.
- ^ Y'Blood 1981, p. 212.
- ^ Peattie 2007, p. 188; Willmott 2005, p. 37.
- ^ a b c Stille 2014, p. 49.
- ^ a b c Stille 2014, p. 50.
- ^ Stille 2014, p. 50; Willmott 2005, p. 255.
- ^ Willmott 2005, p. 254.
- ^ a b c d e f Dull 2013, p. 333.
- ^ a b c d Dull 2013, p. 335.
- ^ Evans & Peattie 1997, pp. 295 & 370.
- ^ Evans & Peattie 1997, pp. 379–380.
- ^ a b Evans & Peattie 1997, p. 315.
- ^ a b Evans & Peattie 1997, p. 323.
- ^ "Carrier Locations - Pearl Harbor Attack". public1.nhhcaws.local. Retrieved 2022-09-10.
- ^ Evans & Peattie 1997, p. 312.
- ^ Evans & Peattie 1997, p. 325.
- ^ a b Evans & Peattie 1997, p. 314.
- ^ Evans & Peattie 1997, p. 313.
- ^ The Illustrated Directory of Fighters Mike Spick p. 219
- ^ Japan and Germany in the modern world by Bernd Martin p. 280
- ^ The origins of Japanese trade supremacy: development and technology in Asia by Christopher Howe p. 313ff [1]
- ^ Evans & Peattie 1997, p. 266.
- ^ Cold War submarines: the design and construction of U.S. and Soviet submarines by Norman Polmar, Kenneth J. Moore pp. 246–247 [2]
- ^ Japanese submarines, p. 70
- ^ a b c d Evans & Peattie 1997, p. 497.
- ^ Tonnage Sunk, Pacific 1941 – 1945
- ^ Cold War submarines: the design and construction of U.S. and Soviet submarines by Norman Polmar, Kenneth J. Moore pp. 247–248 [3]
- ^ a b The Divine Wind: Japan's Kamikaze Force in World War II Rikihei Inoguchi, Tadashi Nakajima, Roger Pineau p. 150 [4]
- ^ a b c d Making sense of suicide missions Diego Gambetta p. 7ff
- ^ The Japanese submarine force and World War II Carl Boyd, Akihiko Yoshida p. 34 [5]
- ^ The Naval Institute historical atlas of the U.S. Navy Craig L. Symonds, William J. Clipson p. 186 [6]
Bibliography
- Dull, Paul S. (2013) [1978]. A Battle History of the Imperial Japanese Navy (repr. ed.). Annapolis, Maryland: Naval Institute Press. ISBN 978-1-612-51290-7.
- Evans, David C.; Peattie, Mark R. (1997). Kaigun: Strategy, Tactics, and Technology in the Imperial Japanese Navy, 1887–1941. Annapolis, Maryland: Naval Institute Press. ISBN 0-87021-192-7.
- Peattie, Mark R. (2007). Sunburst: The Rise of Japanese Naval Air Power, 1909–1941. Annapolis, Maryland: Naval Institute Press. ISBN 978-1-61251-436-9.
- Parshall, Jonathan; Tully, Anthony (2005). Shattered Sword: The Untold Story of the Battle of Midway. Dulles, Virginia: Potomac Books. ISBN 1-57488-923-0.
- Prados, John (2012). Islands of Destiny: The Solomons Campaign and the Eclipse of the Rising Sun. Dulles, Virginia: Penguin. ISBN 978-1-101-60195-2.
- Prados, John (2016). Storm Over Leyte: The Philippine Invasion and the Destruction of the Japanese Navy. New York City: Penguin. ISBN 978-0-698-18576-0.
- Stille, Mark (2014). The Imperial Japanese Navy in the Pacific War. Osprey Publishing. ISBN 978-1-47280-146-3.
- Stille, Mark (2013). The naval battles for Guadalcanal 1942: Clash for supremacy in the Pacific. Osprey Publishing. ISBN 978-1-78096-154-5.
- Willmott, H.P. (2014). Empires in the Balance: Japanese and Allied Pacific Strategies to April 1942 (reprint, 1982 ed.). Annapolis, Maryland: Naval Institute Press. ISBN 978-1-612-51728-5.
- Willmott, H.P. (1984). June 1944. New York, NY: Blandford Press. ISBN 0-7137-1446-8.
- Willmott, H.P. (1983). The Barrier and the Javelin. Annapolis, Maryland: United States Naval Institute Press. ISBN 0-87021-092-0.
- Willmott, H.P. (2005). The Battle Of Leyte Gulf: The Last Fleet Action. Indiana University Press. ISBN 0-253-34528-6.
- Willmott, H.P. (2002). The War with Japan: The Period of Balance, May 1942-October 1943. Rowman & Littlefield Publishers. ISBN 1-461-64607-3.
- Y'Blood, William T. (1981). Red Sun Setting: The Battle of the Philippine Sea. Annapolis, Maryland: Naval Institute Press. ISBN 1-59114-994-0.